智能相机 SDK (Smart Vision) 开发者文档
Smart Vision Guide
Introduction
Feature Description
Smart Vision SDK provides developers with:
- API interfaces to operate and acquire camera image data for subsequent AI model inference.
- IO/TCP signal output API interfaces. Signal output can send NG/Alarm/Alarm Clear signals.
Smart Vision SDK provides both C++ and Python interfaces. Developers can choose according to their needs.
Development Environment
Smart Vision SDK runs in the Aidlux smart camera environment.
| Category | Requirement |
|---|---|
| Operating System | Ubuntu20.04 |
| Aidlux | aidlux_2.x.x.x |
| Supported Language | Python3.8 / Python3.7 / C++ |
Limitations
Can only run under the conditions specified in the Development Environment.
Installation/Uninstallation
Smart Vision SDK can be installed or uninstalled via the Application Center. For Application Center operation instructions, please refer to the corresponding documentation.
It can also be installed or uninstalled online via command, for example:
# Install:
sudo aid-pkg install smartvision-sdk

# Uninstall:
sudo aid-pkg remove smartvision-sdk
Camera Opening Process
Flow Chart
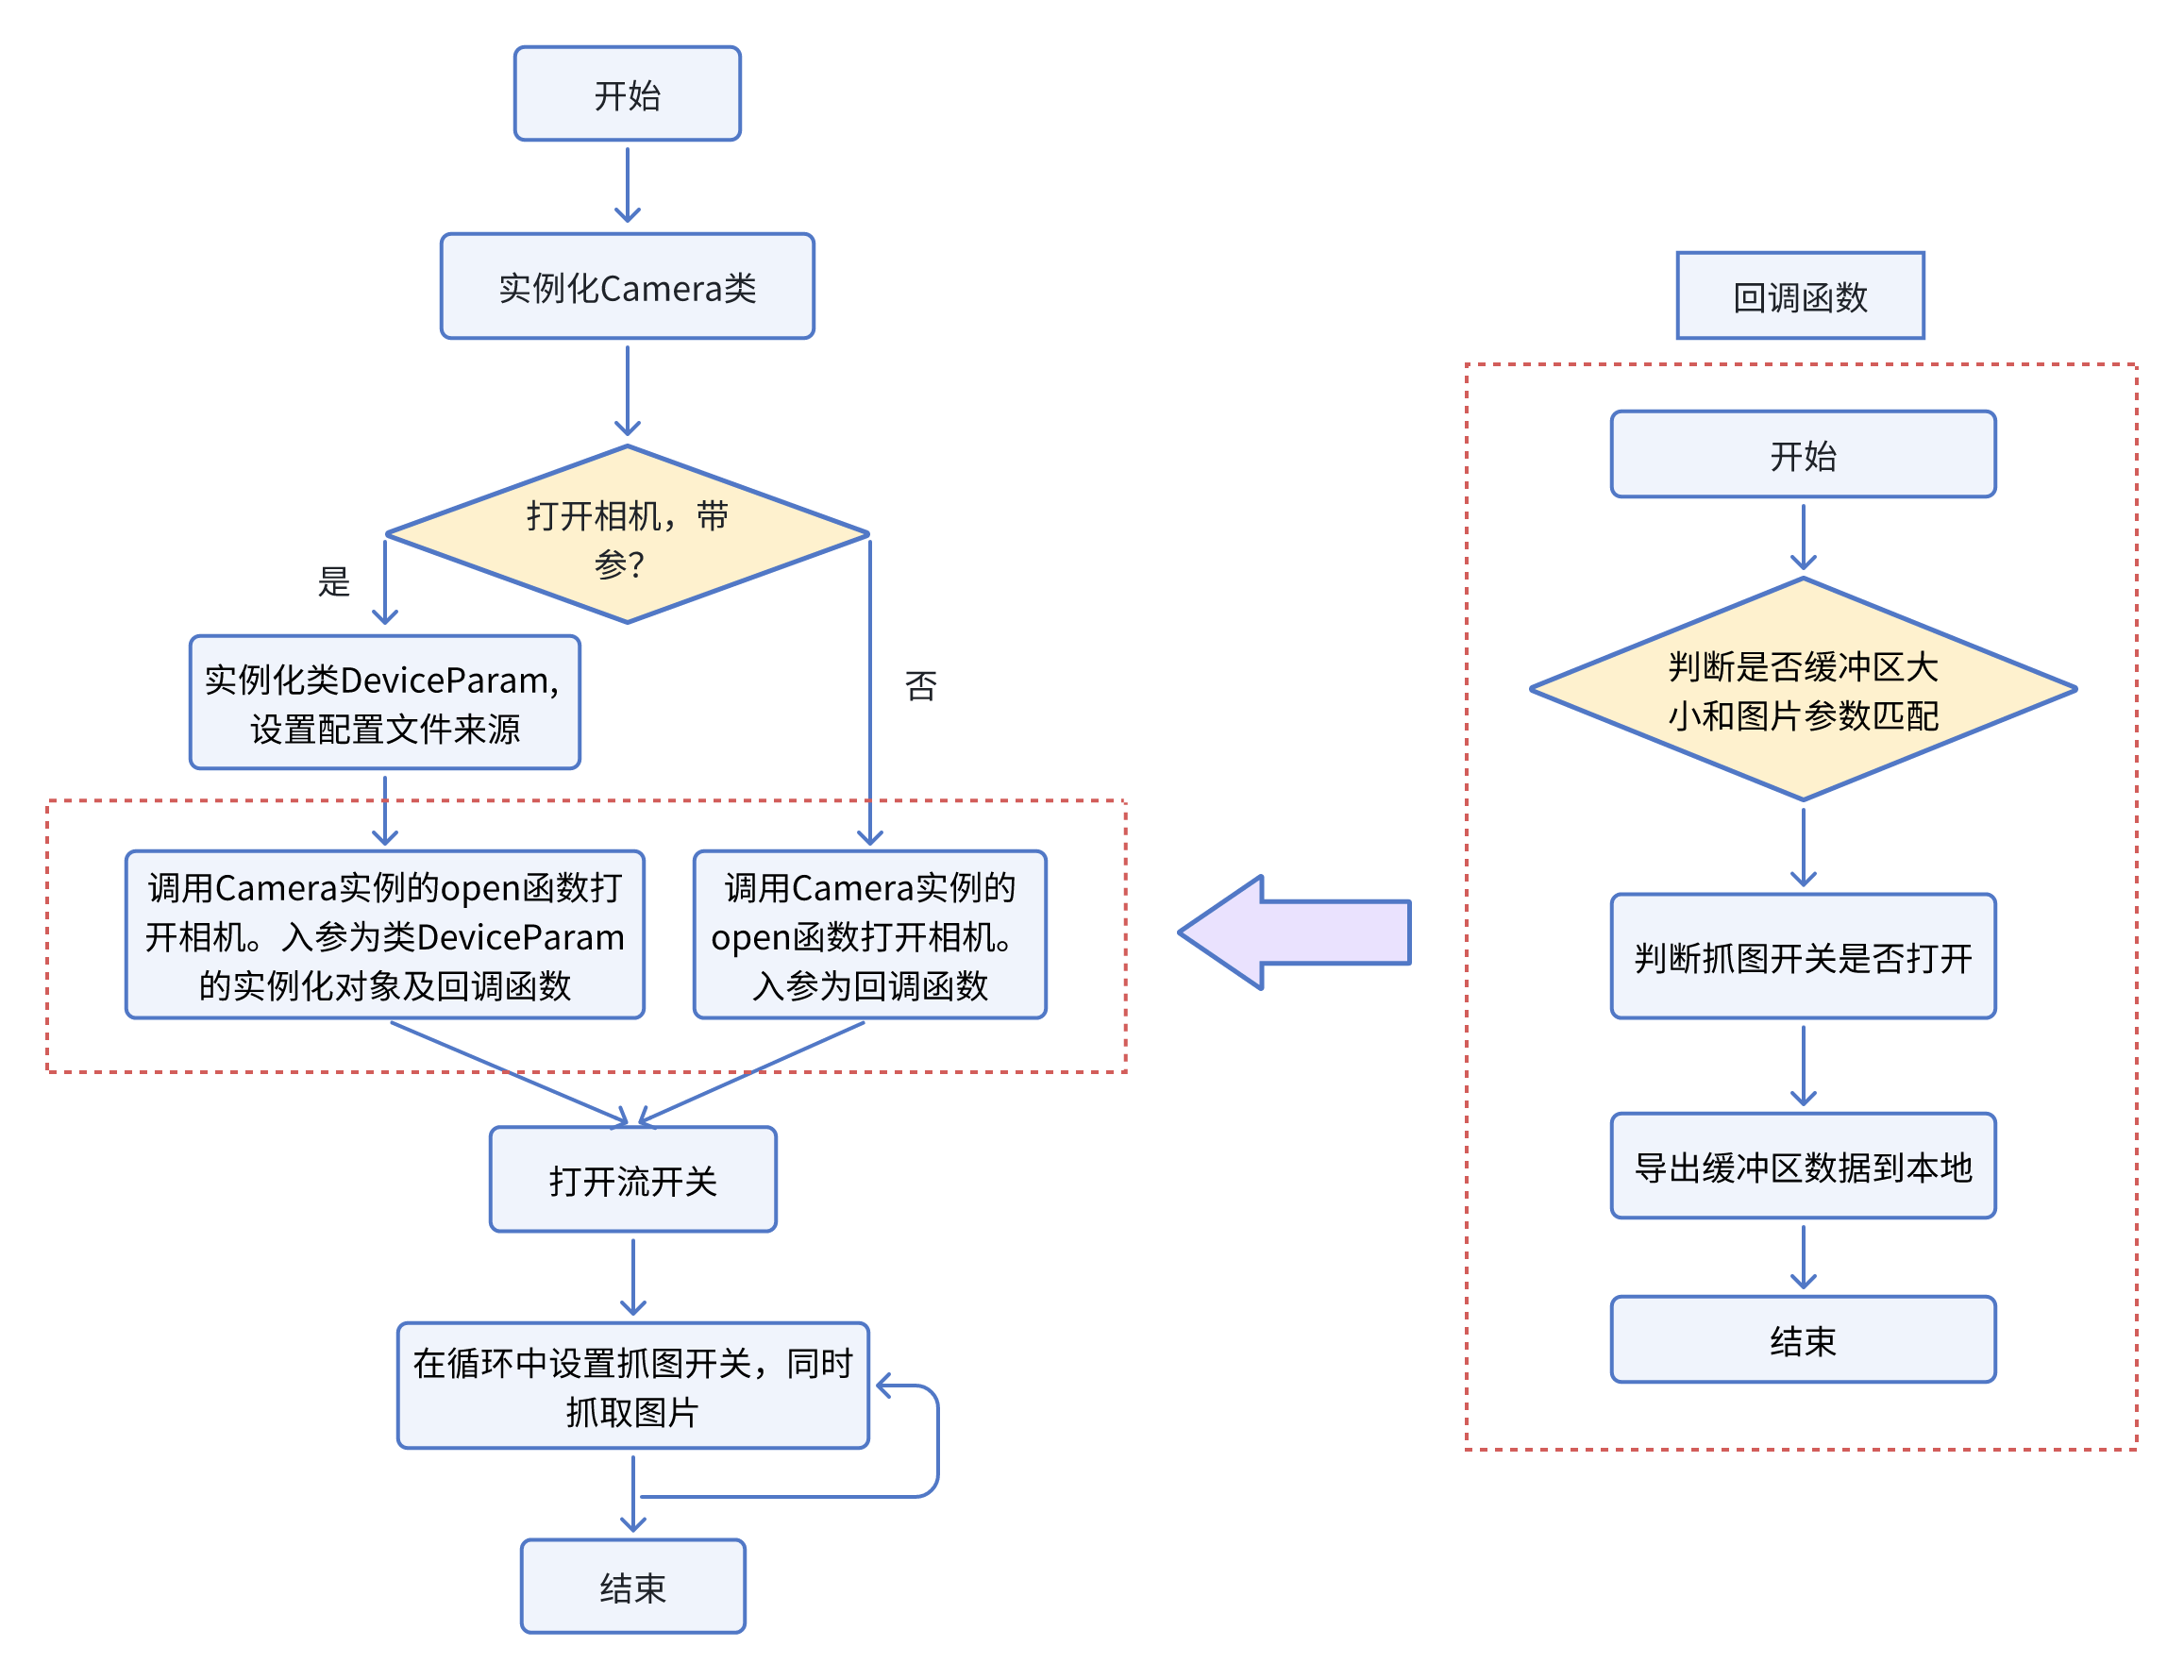
Detailed Process Steps
- Instantiate the Camera class to create a Camera object.
- Call the Open() function of the Camera object to open the camera (with or without parameters).
- To open the camera in parameter mode, you need to instantiate the DeviceParam struct first, set the camera configuration file, and pass this object as a parameter to the Open() function. For details, refer to the Open Camera with Parameters API interface. For camera configuration files, refer to Camera Configuration File.
- To open the camera in parameterless mode, you can directly call the Open() function with only the callback function name as the parameter. For details, refer to the Open Camera in Parameterless Mode API interface.
- If the camera is opened successfully, start streaming. Otherwise, exit.
- Set the image capture switch and main business loop. Continuously capture image data from the callback function in the loop. For details, refer to the code examples.
- Stop streaming according to business requirements and exit the application.
- Parameterless mode means no camera configuration parameters need to be passed when opening the camera. The SDK uses the camera's current configuration parameters to open the camera.
- Parameter mode means camera configuration parameters need to be passed when opening the camera. The SDK uses the passed configuration parameters to open the camera.
- From a usage perspective, camera configuration can be set through the SVE interface, which is relatively more convenient and intuitive. Therefore, using parameterless mode with SVE interface settings is more flexible and easy to use.
- Parameter mode can be used as a flexible option for backend programming.
Logging Function
SDK logging functions include:
- Print logs (console output)
- Save logs (save to file)
- Dynamically set log level (dynamically change current log level configuration via command, affecting file output)
- Disable logging (disable log file output)
Dynamically modify log level:
Format:
/opt/aidlux/cpf/aid-rtcm/tools/rtcm_tool <Command> <Module> <Key> <Value>

Where:
- Command: set or '-s'
- Module: smartvisionsdk_<pid>
- Key: log_level
- Value:
  - off: Disable logging
  - err: Print error logs
  - warn: Print warning logs
  - info: Print info logs

Example:
/opt/aidlux/cpf/aid-rtcm/tools/rtcm_tool set smartvisionsdk_1234 log_level info

To query the PID of the currently running program using smartvision SDK:
/opt/aidlux/cpf/aid-rtcm/tools/rtcm_tool query smartvisionsdk camera_process_id

For more usage of the rtcm_tool, refer to its help information.
Modify log file path:
Format:
/opt/aidlux/cpf/aid-rtcm/tools/rtcm_tool <Command> <Module> <Key> <Value>

Where:
- Command: set or '-s'
- Module: smartvisionsdk_<pid>
- Key: log_file_path
- Value: Log file path. e.g., /home/aidlux/ means log files will be created under /home/aidlux/. (Note: SDK initial logs are stored in /tmp/smartvisionsdk/ by default)

Example:
/opt/aidlux/cpf/aid-rtcm/tools/rtcm_tool set smartvisionsdk_1234 log_file_path /home/aidlux/

The default log file path is the directory where the application is located.

To query the PID of the currently running program using smartvision SDK:
/opt/aidlux/cpf/aid-rtcm/tools/rtcm_tool query smartvisionsdk camera_process_id

For more usage of the rtcm_tool, refer to its help information.
Query log level configuration:
Format:
/opt/aidlux/cpf/aid-rtcm/tools/rtcm_tool <Command> <Module> <Key>

Where:
- Command: query or '-q'
- Module: smartvisionsdk_<pid>
- Key: log_level

Example:
/opt/aidlux/cpf/aid-rtcm/tools/rtcm_tool query smartvisionsdk_1234 log_level
Logs are saved in the same directory as the application executable. For example:
$ ls -rlt
-rwxr-xr-x. 1 aidlux aidlux 127032 Jun 21 11:50 demo
-rw-r--r--. 1 aidlux aidlux 919473 Jun 21 13:34 aidclog_smartvisionsdk_logger_115125_429_2024-06-21.aidclog
C++ Example Code
MIPI Camera
#include "smart_vision.hpp"
using namespace std;
using namespace Aidlux::SmartVision;

int stop_sign = 0;
bool data_sign = false;
cv::Mat sdk_frame;

// Define callback function my_get_img_cb
int8_t my_get_img_cb(const Image & cap_img, const SVSdkMemfdInfo & mem_info) {
    if(data_sign) {
        // Convert data in buffer to sdk_frame Mat object
        yuv_to_bgr(sdk_frame, mem_info.srcSliceHeight, mem_info.srcYPlaneStride, mem_info.planeOffset, (void*)cap_img.data);
        data_sign = false;
    }
    return 0;
}

int main(int argc, char * argv[]) {
    Aidlux::SmartVision::Camera camera; // Instantiate Camera class
    int res = camera.open(my_get_img_cb); // Open camera
    if (res != 0) {
        cout << "Opening the camera failed!" << endl;
        return -1;
    }
    camera.start_capture(); // Start streaming
    while(!stop_sign) {
        data_sign = true;
        while(data_sign && (!stop_sign)) {
            usleep(1000);
        }
        if(stop_sign) {
            break;
        }
        // Business code - process data saved to sdk_frame in callback function
        // ...
    }
    camera.close(); // Close camera and related switches
    return 0;
}
Hikvision Camera
#include "smart_vision.hpp"
using namespace std;
using namespace Aidlux::SmartVision;

int stop_sign = 0;
bool data_sign = false;
cv::Mat sdk_frame;

// Define callback function usb_get_img_cb
int8_t usb_get_img_cb(const Image & cap_img, const SVSdkMemfdInfo & memInfo)
{
    // Add handler, only process when data_sign is true
    if(data_sign){
        cout << "image w=" << cap_img.w << ", h=" << cap_img.h << ", length=" << cap_img.length << ", fps=" << Aidlux::SmartVision::get_fps(8) << endl;
        // Auto-adapt based on width and height
        cv::Mat _image(cap_img.h, cap_img.w, CV_8UC3, (void*)cap_img.data);
        sdk_frame.resize(cap_img.length);
        sdk_frame = _image.clone();

        data_sign = false;
    }

    return 0;
}

int main(int argc, char * argv[]) {
    Aidlux::SmartVision::Camera camera;
    camera.set_camera_type(Aidlux::SmartVision::CameraType::USB_CAMERA_ENUM3);
    camera.init_hik_parameters();
    Aidlux::SmartVision::GetImageCB _callback = usb_get_img_cb;
    if (0 > camera.open(_callback) ){
        printf("open cam failure\n");
        return -1;
    }

    while(!stop_sign){
        data_sign = true;
        while(data_sign && (!stop_sign)){
            usleep(10000);
        }
        if(stop_sign)
            break;

        // Business code - process data saved to sdk_frame in callback function
        // ...
    }

    camera.close();
    return 0;
}
Generic USB Camera
#include "smart_vision.hpp"
using namespace std;
using namespace Aidlux::SmartVision;

int stop_sign = 0;
bool data_sign = false;
cv::Mat sdk_frame;

// Define callback function usb_get_img_cb
int8_t usb_get_img_cb(const Image & cap_img, const SVSdkMemfdInfo & memInfo)
{
    // Add handler, only process when data_sign is true
    if(data_sign){
        cout << "image w=" << cap_img.w << ", h=" << cap_img.h << ", length=" << cap_img.length << ", fps=" << Aidlux::SmartVision::get_fps(7) << endl;
        // Auto-adapt based on width and height
        cv::Mat _image(cap_img.h, cap_img.w, CV_8UC3, (void*)cap_img.data);
        sdk_frame.resize(cap_img.length);
        sdk_frame = _image.clone();

        data_sign = false;
    }

    return 0;
}

int main(int argc, char * argv[]) {
    Aidlux::SmartVision::Camera camera;
    camera.set_camera_type(USB_CAMERA_ENUM2);
    Aidlux::SmartVision::CameraParam cam_param;
    cam_param.camera_type = USB_CAMERA_ENUM2;
    cam_param.width = 640;
    cam_param.height = 480;
    cam_param.fps = 30;
    camera.set_parameters(cam_param);

    Aidlux::SmartVision::GetImageCB _callback = usb_get_img_cb;
    if (0 != camera.open(_callback) ){
        printf("open cam failure\n");
        return -1;
    }

    cout << "begin work" << endl;
    while(!stop_sign){
        data_sign = true;
        while(data_sign && (!stop_sign)){
            usleep(5000);
        }
        if(stop_sign)
            break;

        // Business code - process data saved to sdk_frame in callback function
        // ...
    }

    camera.close();
    cout << "stop work" << endl;
    return 0;
}
C++ Example Code Explanation
First, instantiate the Camera class:
Aidlux::SmartVision::Camera camera;Then call the open() function to open the camera.
For parameterless mode, directly pass the callback function name my_get_img_cb. (Note: Currently, generic USB cameras and Hikvision cameras only support setting a small number of parameters such as resolution. It is recommended to refer to the examples. Unless otherwise specified, all configurations are for MIPI cameras.)
For parameter mode, you also need to instantiate the DeviceParam struct and set the camera configuration file name and path. Then pass the DeviceParam instance and callback function name to the open() function.
// Parameterless mode
int res = camera.open(my_get_img_cb);
// Parameter mode
DeviceParam device_param;
device_param.cfg_name = "./config.json";
int res = camera.open(device_param, my_get_img_cb);
Next, if the camera is opened successfully, call the start_capture function to start streaming.
Then design a while loop to continuously acquire image data copied from the callback function.
Since the acquired data is raw YUV data that needs to be converted to BGR format, you need to call the yuv_to_bgr API for conversion.
// sdk_frame is a Mat object, converted data is stored in sdk_frame. cap_img.data is the raw data pointer
// mem_info.srcSliceHeight is the height of YUV data, mem_info.srcYPlaneStride is the width of YUV data
yuv_to_bgr(sdk_frame, mem_info.srcSliceHeight, mem_info.srcYPlaneStride, mem_info.planeOffset, (void*)cap_img.data);
The converted data is used for AI inference and result preview.
Finally, when data acquisition is no longer needed, call the stop_capture function to stop streaming and exit the main program.
Python Example Code
from pysmartvision import smartvisionsdk
import numpy as np
import time
import os

data_sign = False
img_array = []
keep_sign = 1

# Define callback function get_img_cb
def get_img_cb(cap_img, mem_info):
    global data_sign
    global img_array

    if (data_sign):
        # Get image data
        im = smartvisionsdk.get_cvimage(cap_img)
        print("the image is got successfully")
        img_array = np.array(im, copy=True)
        data_sign = False

    return 0

if __name__ == '__main__':
    # Initialize camera
    try:
        print("instance camera")
        # Instantiate Camera class
        camera_instance = smartvisionsdk.Camera()
        # Open camera
        if camera_instance.open(get_img_cb) == 0:
            print("camera is opened successfully")
        else:
            raise ValueError("camera started failed.")

        # Start streaming
        camera_instance.start_capture()
    except Exception as e:
        print("camera start Error:", e)
        raise

    try:
        while keep_sign:
            # Get data
            data_sign = True
            count = 0
            while (data_sign):
                if count >= 10 :
                    count = 0
                    print("waiting for the image data in callback function")
                else:
                    time.sleep(0.1)
                    count += 1

                # Business code - process data saved to img_array in callback function
                ...
        # Stop streaming
        camera_instance.close()
    except Exception as e:
        print("error:", e)
    print("end")
    os._exit(0)
Python Example Code Explanation
First, instantiate the Camera class:
camera_instance = smartvisionsdk.Camera()Then call the open() function to open the camera.
For parameterless mode, directly pass the callback function name my_get_img_cb.
For parameter mode, you also need to instantiate the DeviceParam class and set the camera configuration file name and path. Then pass the DeviceParam instance and callback function name to the open() function.
# Parameterless mode
res = camera_instance.open(my_get_img_cb)
# Parameter mode
device_param = smartvisionsdk.DeviceParam()
device_param.set_cfgname("./config.json")
res = camera_instance.open(device_param, my_get_img_cb)
Next, if the camera is opened successfully, call the start_capture function to start streaming.
Then design a while loop to continuously acquire image data copied from the callback function. In the callback function, acquire image data through the get_cvimage interface. (Note: The image data has been converted to BGR format.)
im = smartvisionsdk.get_cvimage(cap_img)The acquired image data is used for AI inference, etc.
Finally, when data acquisition is no longer needed, call the stop_capture function to stop streaming and exit the main program.