端侧部署 Qwen3 系列
介绍
Qwen3 是 Qwen 系列最新一代的大语言模型,提供了完整的稠密模型和专家混合(MoE)模型套件。基于大规模训练,Qwen3 在推理、指令跟随、智能体能力以及多语言支持方面实现了突破性进展
本章节将演示如何在边缘设备上完成 Qwen3 系列模型部署、加载与对话流程。提供以下两种方式部署:
- AidGen C++ API
- AidGenSE OpenAI API
在本案例中,大语言模型推理运行在设备端,通过代码调用相关接口接收用户输入并实时返回对话结果。
- 设备:Rhino Pi-X1
- 系统:Ubuntu 22.04
- 模型:Qwen3-1.7B
支持平台
| 平台 | 运行方式 |
|---|---|
| Rhino Pi-X1 | Ubuntu 22.04, AidLux |
准备工作
Rhino Pi-X1 硬件
Ubuntu 22.04 系统或 AidLux 系统
AidGen 案例部署
步骤一:安装 AidGen SDK
bash
# 安装 AidGen SDK
sudo aid-pkg update
sudo aid-pkg -i aidgen-sdk
sudo aid-pkg -i aidgen-qnn236
sudo aid-pkg -i aidgen-qnn240

# 拷贝测试代码
cd /home/aidlux/aidllm

cp -r /usr/local/share/aidgen/examples/ ./
步骤二:下载模型资源
由于 Qwen3-1.7B 目前位于 Model Farm 预览板块中,需要通过
mms命令获取
bash
# 登录
mms login

# 查找模型
mms list qwen3

# 下载模型
mms get -m Qwen3-1.7B -p w4a16 -c qcs8550 -b qnn2.36 -d /home/aidlux/aidllm/qwen3-1.7b

cd /home/aidlux/aidllm/qwen3-1.7b
unzip qnn236_qcs8550_cl4096.zip
mv qnn236_qcs8550_cl4096/* /home/aidlux/aidllm/
步骤三:配置文件创建
bash
cd /home/aidlux/aidllm
vim qwen3-1.7b-aidgen-config.json
创建如下 json 配置文件
json
{
    "backend_type": "genie",
    "prefix_path": "kv-cache.primary.qnn-htp",
    "model": {
        "path": [
            "qwen3-1.7b_qnn236_qcs8550_cl4096_1_of_3.serialized.bin.aidem",
            "qwen3-1.7b_qnn236_qcs8550_cl4096_2_of_3.serialized.bin.aidem",
            "qwen3-1.7b_qnn236_qcs8550_cl4096_3_of_3.serialized.bin.aidem"
        ]
    }
}
步骤四:资源文件确认
文件分布如下:
bash
/home/aidlux/aidllm
├── chat-think.txt
├── chat-nothink.txt
├── htp_backend_ext_config.json
├── qwen3-1.7b-aidgen-config.json
├── kv-cache.primary.qnn-htp
├── qwen3-1.7b_qnn236_qcs8550_cl4096_1_of_3.serialized.bin.aidem
├── qwen3-1.7b_qnn236_qcs8550_cl4096_2_of_3.serialized.bin.aidem
├── qwen3-1.7b_qnn236_qcs8550_cl4096_3_of_3.serialized.bin.aidem
├── examples
步骤五:编译运行
bash
cd /home/aidlux/aidllm/examples

# 编译
mkdir build && cd build
cmake .. && make

mv test_text_only /home/aidlux/aidllm/

cd /home/aidlux/aidllm/
./test_text_only qwen3-1.7b-aidgen-config.json "hi"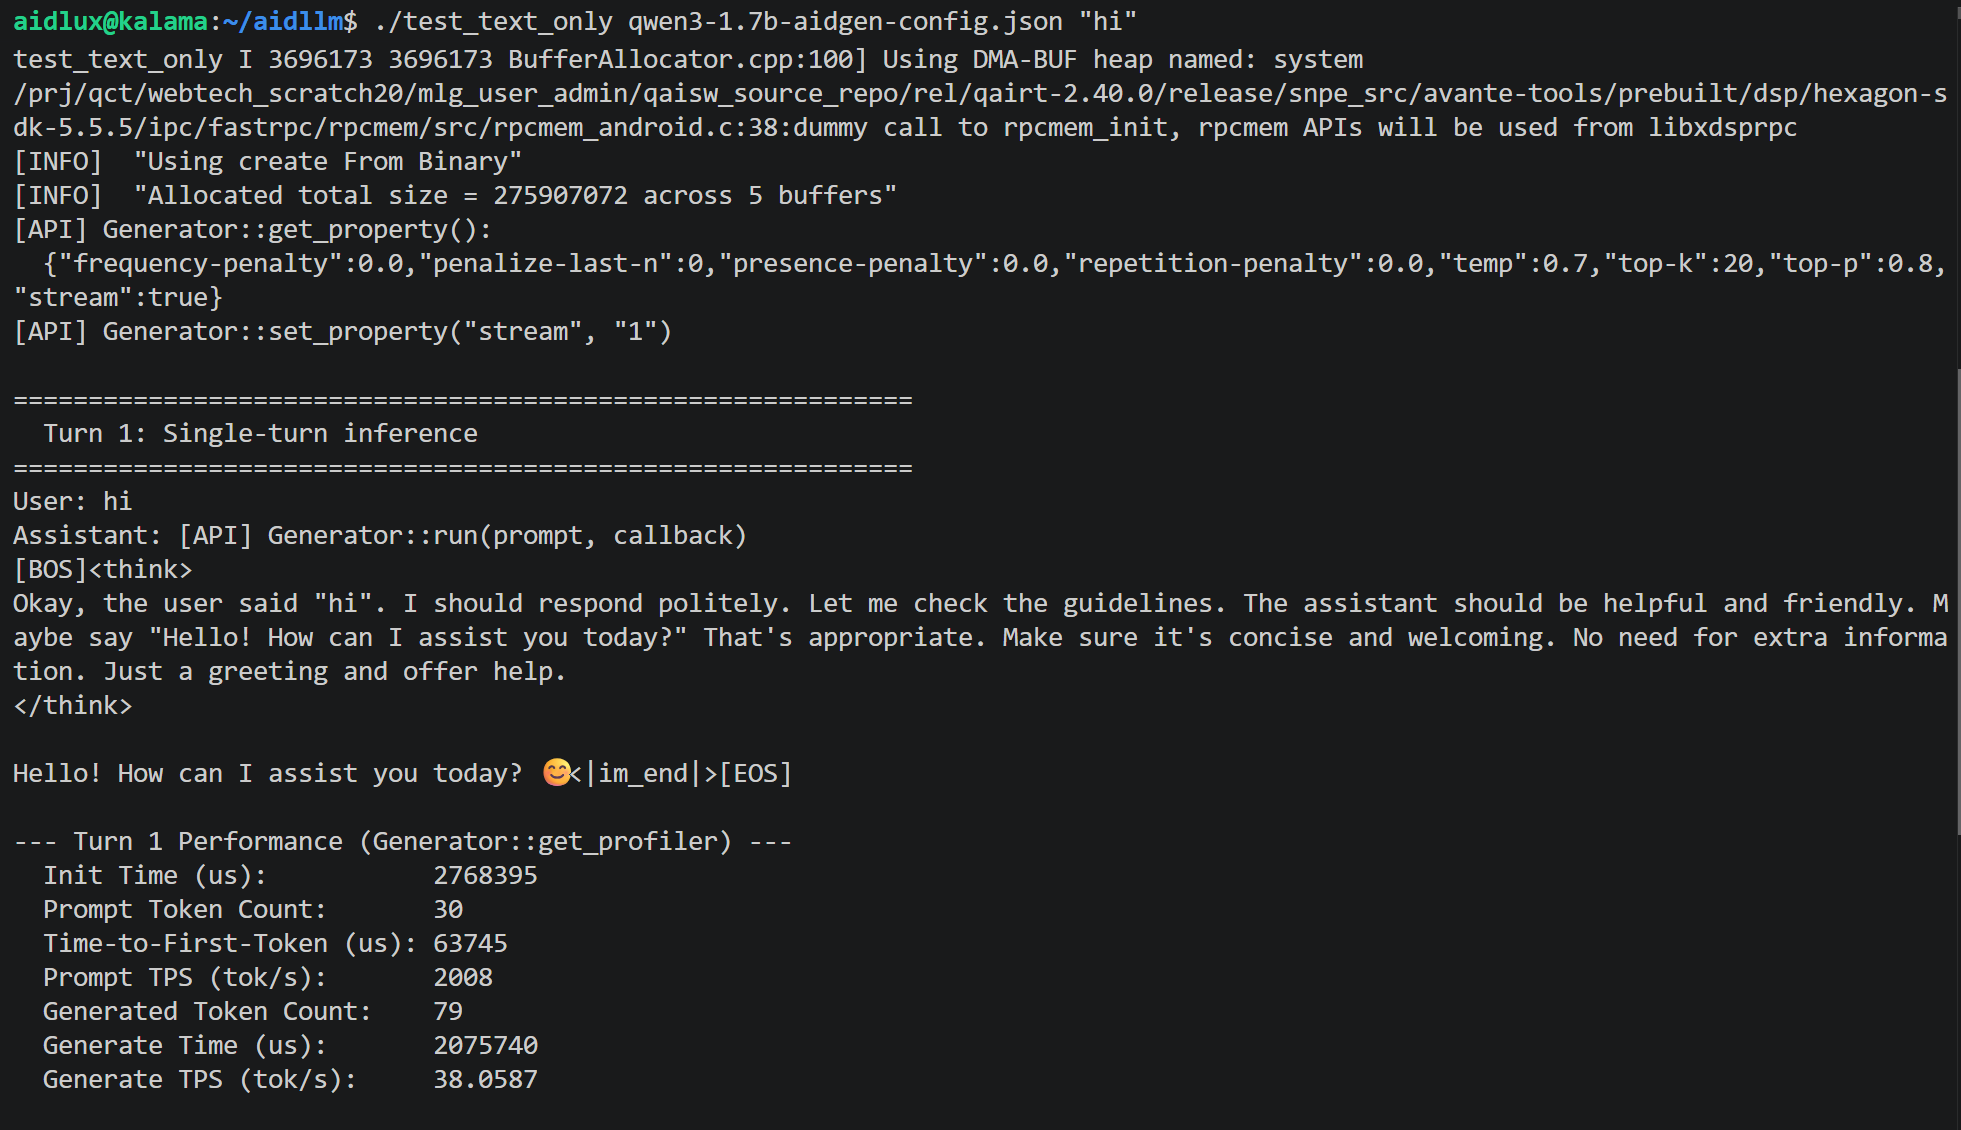
AidGenSE 案例部署
步骤一:安装 AidGenSE
bash
sudo aid-pkg update

# 确保 aidgense 是最新版本
sudo aid-pkg remove aidgense
sudo aid-pkg -i aidgense
sudo aid-pkg -i aidgen-sdk
sudo aid-pkg -i aidgen-qnn236
sudo aid-pkg -i aidgen-qnn240
步骤二:模型查询 & 获取
bash
# 查看模型
aidllm remote-list api | grep Qwen3

#------------------------可以看到 Qwen3 模型------------------------

Current Soc : 8550

Name                                                    Url                                                           CreateTime
-----                                                   ---------                                                     ---------
qwen3-0.6b-qnn2.36-w4a16-qcs8550                        aplux/qwen3-0.6b-qnn2.36-w4a16-qcs8550                        2026-05-15 10:59:35
qwen3-1.7b-qnn2.36-w4a16-qcs8550                        aplux/qwen3-1.7b-qnn2.36-w4a16-qcs8550                        2026-05-15 10:57:37
qwen3-4b-basic-quant-qnn2.36-w4a16-qcs8550              aplux/qwen3-4b-basic-quant-qnn2.36-w4a16-qcs8550              2026-05-15 10:59:47
qwen3-4b-instruct-2507-qnn2.36-w4a16-qcs8550            aplux/qwen3-4b-instruct-2507-qnn2.36-w4a16-qcs8550            2026-05-15 10:57:45
...

# 下载 qwen3-1.7B-8550

aidllm pull api aplux/qwen3-1.7b-qnn2.36-w4a16-qcs8550
步骤三:启动 HTTP 服务
bash
# 启动对应模型的 openai api 服务
aidllm start api -m qwen3-1.7b-qnn2.36-w4a16-qcs8550

# 查看状态
aidllm status api

# 停止服务: aidllm stop api

# 重启服务: aidllm restart api
💡注意
默认端口号是 8888
步骤四:对话测试
使用 Web UI 对话测试
bash
# 安装 UI 前端服务
sudo aidllm install ui

# 启动 UI 服务
aidllm start ui

# 查看 UI 服务状态: aidllm status ui

# 停止 UI 服务: aidllm stop ui
UI 服务启动后访问 http://ip:51104
使用 Python 对话测试
python
import os
import requests
import json

def stream_chat_completion(messages, model="qwen3-1.7b-qnn2.36-w4a16-qcs8550"):

    url = "http://127.0.0.1:8888/v1/chat/completions"
    headers = {
        "Content-Type": "application/json"
    }
    payload = {
        "model": model,
        "messages": messages,
        "stream": True    # 打开流式
    }

    # 发起带 stream=True 的请求
    response = requests.post(url, headers=headers, json=payload, stream=True)
    response.raise_for_status()

    # 逐行读取并解析 SSE 格式
    for line in response.iter_lines():
        if not line:
            continue
        # print(line)
        line_data = line.decode('utf-8')
        # SSE 每一行以 "data: " 前缀开头
        if line_data.startswith("data: "):
            data = line_data[len("data: "):]
            # 结束标志
            if data.strip() == "[DONE]":
                break
            try:
                chunk = json.loads(data)
            except json.JSONDecodeError:
                # 解析出错时打印并跳过
                print("无法解析JSON:", data)
                continue

            # 取出模型输出的 token
            content = chunk["choices"][0]["delta"].get("content")
            if content:
                print(content, end="", flush=True)

if __name__ == "__main__":
    # 示例对话
    messages = [
        {"role": "system", "content": ""},
        {"role": "user", "content": "Give me a short introduction to large language model."}
    ]
    print("Assistant:", end=" ")
    stream_chat_completion(messages)
    print()  # 换行